 Click to call
DIY: How to Make an Apron at Home
Whether you’re cooking, gardening, painting, or doing any other messy task, an apron is a great way to keep your clothing clean. Don’t want to spend money on a new apron? With some fabric and a sewing machine, you can create your very own custom apron suited to the task at hand. Here are the DIY tips you need on how to make apron at home.
Benefits of Wearing an Apron
First and foremost, wearing an apron protects your clothes. Who cares if you get grease or flour on your apron? That’s what it’s for!
Aprons also provide a useful place to wipe your hands or store small supplies you want to carry with you. They are unpretentious yet empowering, simple yet incredibly convenient. And with the right fabric, aprons can even make a fashion statement!
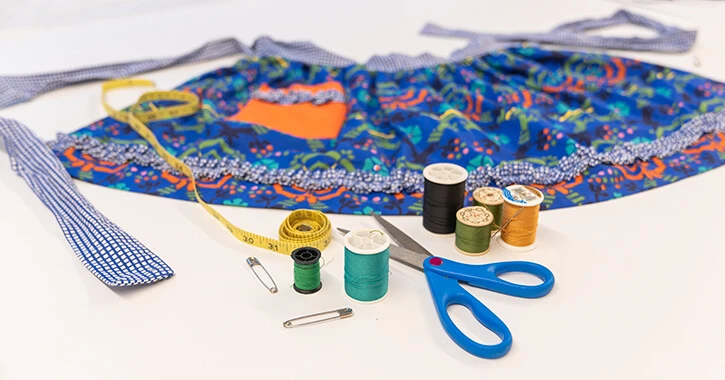
How to Make an Apron: Gather Your Supplies
Here’s a list of what you need to make your own apron:
- One square yard of durable fabric
- Fabric scissors
- Thread that matches your fabric
- Pencil
- Measuring tape
- Sewing machine
Instructions for How to Make an Apron at Home
Don’t have an apron pattern? No problem! Aprons aren’t complicated, so you can make one with only a few simple measurements and basic sewing skills. Here’s what to do:
- Cut your one square yard of fabric down to 27 inches long by 20 inches wide. Save the scraps.
- Fold the fabric in half long-ways with the wrong side facing out. Measure 4 inches over from the crease and make a small mark with a pencil. (When unfolded, this gives you 8 inches of fabric for the top of the apron.)
- Place your measuring tape at the bottom of the apron and measure 18 inches up along the open side (rather than the creased side). Make a small mark.
- Freehand a curved line connecting the mark you made in step 2 with the mark you made in step 3. This will become the underarm portion of the apron.
- Cut along this curved line with fabric scissors, being sure to cut both layers of fabric at once.
- Sew a hem around the edges of the fabric with your sewing machine.
- Now, you need to add the straps. Cut the fabric scraps you saved into three strips measuring about 2 inches wide. Two should be 36 inches long for the ties, and the third should be 18 inches long for the neck strap.
- Fold each strip of fabric long-ways with the wrong side facing out, and sew the seam closed. When you almost reach the end of the strip, turn it right-side out. Finish by tucking the ends in and stitching them closed.
- Sew the back ties to the apron where the curved line meets the bottom half of the apron. For added strength, sew a square with an X in the middle. Sew on the neck strap in the same way at the top corners of the apron.
This is the simplest way to make an apron at home, but you can also add a pocket, patches, and trim designs if you’re more comfortable with a sewing machine. Remember to wear your homemade apron anytime you want to protect your clothes. Looking for ideas to tackle those dusty corners of junk in your home, now that you have an apron? Check out these organization tips and services from Mr. Handyman, one of our fellow Neighborly brands.
Kitchen Appliance Repair
Aproned chefs are only as good as their kitchen appliances. If your oven, stovetop, or refrigerator is on the fritz, Mr. Appliance® can perform the necessary repairs to get your kitchen up and running again. Please contact us today to schedule the services you need!